CREATING THE SAN DAMIANO CRUCIFIX MOSAIC (PART 2)
BRINGING A CONCEPT INTO REALITY
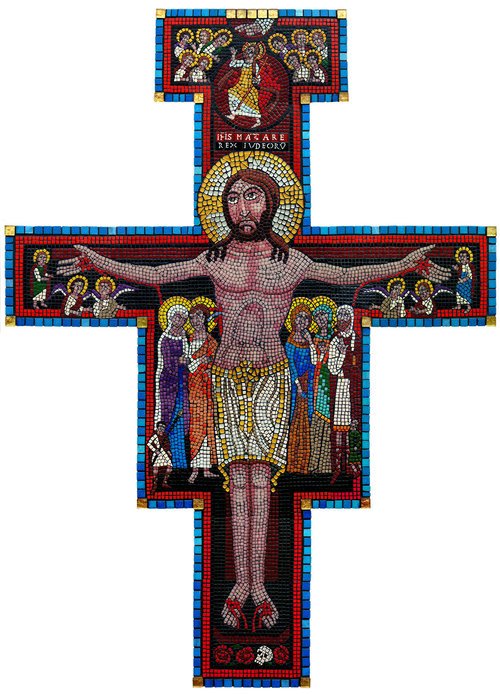
As I covered in part 1 of this blog post, I was inspired to recreate the ancient San Damiano Cross, which was done in either oil or tempura on panel, in glass mosaic tile. I had what I considered 2 successful projects under my belt and no formal training whatsoever, so why not tackle a 5’ crucifix with at least 24 different characters?!
What’s unique to planning a mosaic, as opposed to painting, is you have to figure out every color you are going to need ahead of time. I’m lucky, because my main supply house for mosaic materials, Mosaic Art Supply, ships from the east side of Atlanta, only a day away by Priority Mail. That still is an irritating delay when you are in a creative groove. In addition, there were some really tricky design challenges that I couldn’t solve with standard tiles:
Turquoise tiles - I was determined to have a turquoise border for my Latin American flavor. Actual jewelry quality tiles are available, but the sites are targeted to tile work in bathrooms I will never see. Prices weren’t included, and the photos were amazing. Obviously, they were for very rich clientele — well above my price range. After a lot of online research, I decided on 3 different turquoise shades of glass, one that actually had an pearlescent finish. I randomly alternated the tiles to give the feel of natural turquoise.
Gold tiles - The square tiles weren’t a problem, because they are available from my main supplier. They are basically thick glass backed by gold leaf. That took care of the effect I was looking for above God’s hand, representing heaven, and the corners. I tested breaking these into pieces to work for the halo of Jesus, and it wasn’t happening. The glass was about 1/8” thick, so typical methods of scoring and snapping wasn’t going to work. After some searching, I found another supplier, Masaic Trader USA, that has gold and silver “puzzle” tiles. These were similar glass tiles backed by gold or silver leaf, but in several different shapes that you can assemble like a puzzle. They worked so well that I was even able to use these for the trim and knot of Jesus’ garment.
Letter tiles - The Latin characters over Jesus’ head were a particular challenge. There was no way I was going to attempt building those from pieces of tiles. By the end of the construction of this piece, after I had the practice with the faces and fingers of all the figures, I may have been able to pull that off. In the planning stages, I had to work with the skills I had at the time. I considered painting ceramic tiles and having them kiln fired. That could have worked well, and I’ve seen this kind of mix of ceramic and glass in a mosaic successfully done in the Atlanta airport (I snap cell phone pictures in the strangest places!). That would have posed the logistical challenge and cost of coordinating with a ceramic shop. In the end, I located a source for clear tiles, which I reverse painted in acrylic. Once they were sealed with the glue and further sealed with grout, I figured they would be as permanent as the rest of the piece.
Cobalt blue outer tiles - I wanted the outside edge of the frame to be cobalt blue tiles — again in the them of Latin American tile work. They weren’t that unusual, and were actually available online from Home Depot. Home Depot’s tiles were white ceramic based, which I was worried would peak through around the edges. I ended up finding a good source from Amazon.com. You can’t see it in the photo, but I duplicated the tiles in the reproduction for sale at the bottom of this post.
TIME TO BUILD THE MOSAIC
There comes a time in every project where you have to wrap up the planning and get started. Any creative person, whether artist or writer, I have ever talked to has been able to relate to the terror of facing down a blank sheet, canvas, or in this case plywood. The photo captions below give a breakdown of most of the steps, but I’ll cover here briefly:
I found a digital image of the original San Damiano Cross on Wikapedia, which I uploaded and applied a grid pattern. This is an old art technique used to scale images up to a larger size. You’ll see it commonly used by mural painters.
I set up a 5’ x 4’ piece of 3/4” pine plywood on two saw-horses in my basement. I’m blessed with a basement that is half-unfinished and a very tolerant wife, so I can deal with large messy projects like this in the comfort of my home. I took the width of the plywood and divided it by the same number of segments as my San Damiano Cross digital image. This would be used to create my grid to scale up the image.
Using the grid, I drew out the cross outline. I then cut it out and built a frame of 2’x4’ pine. This provides structural stability. It might seem strange to frame this like the wall of your house, but if the plywood warps and shifts over time when exposed to changes in humidity and temperature, or if it is knocked around when transporting or hanging it, tiles will start to pop off. In addition, I framed the cross beam with a 2’x6” with a 45 degree angle cut. This is an old trick used by cabinet builders to make it easy to hang. All you have to do is mount a 2’x6’ with an opposite angle on the wall, and the cross will just drop right into place. Everything was fastened by screws, because I didn’t want anything shifting or popping out over time, like nails tend to do.
I drew the image directly on the plywood with pencil, using the grid as a guide. I then followed with Sharpie pen, and then watercolor to help plan out the color scheme.
Tiles are generally pasted on one at a time. The larger tiles around the edges were applied with standard mastic, like you’d use for bathroom tile work. Smaller tiles were applied using tile adhesive, which has a consistency of Elmer’s Glue. Tiles were broken into smaller pieces and shapes using standard tile nippers. Larger tiles had to be scored using a glass cutting tool, and then broken off. That’s a different skill-set than I have experience with, but luckily it was only needed in a few areas along the edges.
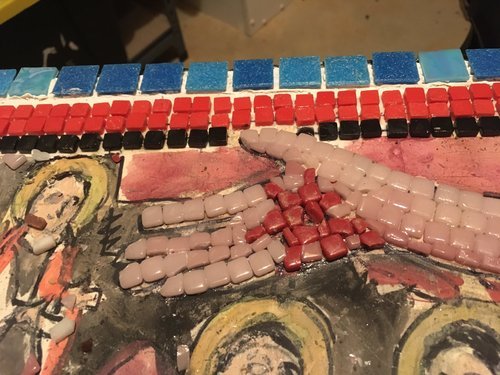
Editing after the adhesive is set is a violent process. I basically used a screwdriver and hammer to chisel off individual tiles so I could replace them with different color choices. For example, I originally had just blood flowing from Jesus’ side, but I later added water per Christian tradition.
Grouting is the same on a mosaic as the back-splash behind your sink. You basically squeeze the grout between the tile joints (the space between the tiles) using a rubber surfaced float tool, and then wipe it down with a wet sponge to shape the grout joints. In this case, I used black grout to bring out all the fine details.

Art students will recognized this method of transferring and scaling an image. You add a grid over an image, figure out the scale of the grid (e.g. a square = 6” x 6”, and draw the grid on where you are reproducing the image.

This is a 5’ x 4’ piece of 3/4” pine plywood, which will the be base of the mosaic. I drew the scaled grid onto the surface.

I transferred the scaled grid onto the sheet of plywood and drew the outside of the cross. From there, I trimmed it out, then screwed on a frame on the back for stability. It is important that the plywood doesn’t warp or bend, even with changes in temperature and humidity and the stresses of moving and hanging the piece.

Glass tiles come in a variety of colors precut in 8mm squares. My main source is Mosaic Art Supply.

The design was first drawn in pencil with the grid for reference, and then inked with Sharpie. Then I over-painted with watercolor to plan the color scheme.

The flesh tone was blended using 3 different colors, which were randomly placed in transition areas to create a dithered effect.
Working on the wounds of Christ, and leaving the gaping holes that would later be filled with grout, was a very moving experience.

The design on the bottom is the only original design in the composition. The bottom of the antique San Damiano Cross was damaged over time, so I would have to take liberties in any case. I decided to go a unique direction, pulling in other tradition symbology. It definitely added to the Latin American flavor!

The amount of detail on the small figures on the top and sides were a real tough challenge. How do you make a face with such low resolution — about 5-6 tiles per face?

Creating mosaic artwork can be a rough business! These are glass tiles, so can be quite sharp when broken in pieces. Normally, I don’t work with a hammer and screwdriver, but making changes after the glue has cured isn’t a gentle process!

The final figures on the left and right of Jesus were fun because they were larger, so allowed greater detail.

The final step is to grout, which locks in the design in concrete. This isn’t some exotic process. Grouting is the same in a mosaic as your bathroom backsplash. I chose black to bring out all the details. Lighter colors provide a softer, more subtle final product, but it can obscure fine details.
13 months and over 6,500 tiles later, the finished San Damiano Cruicifix was born! I was very happy with the final product, and learn so much along the way.
My next challenge would be to figure out a way to photograph and make reproductions of the the final piece, and find a home for the original. I will be covering all of that in part 3 of this post. I am still searching for the final Church home for this piece, so stay tuned for updates on www.facebook.com/paradisefoundstudio.
The San Damiano Crucifix mosaic is an original work by Kevin Pawlowski from Paradise Found Studio LLC. It is 5' tall by 4' wide, with over 6,000 glass tiles. This video takes you through the history of the original crucifix design and the process of assembling the mosaic.