THE MADDENING PROCESS OF CREATING THE “BE NOT AFRAID” MOSAIC

Composition was based on a biblical engraving by Gustave Doré, a 19th century artist I follow closely. I over-painted this image with watercolor. Canvas prints of this painting are available by clicking the above image or here.
I like to create fast artwork. My watercolor engravings tend to take 2-3 hours from start to finish. When oil painting, I prefer to knock out a canvas in 1 or 2 weekends. It might be because I’m busy and tired from my day job marketing industrial chemicals. Most likely, though, it has more to do with my attention span. So how I got involved with a 30” wide mosaic, covered with over 6,000 tiles (by my best estimate), taking 6-weeks, and over 100 hours is anyone’s guess.
As I have visited old buildings and churches over the years, I have always been fascinated by the mosaics. The time and care they must have taken the artists, the intricate detail from such imprecise materials, and the way your brain stitches it all together boggles my imagination. I took a leap into mosaic work with “Transfiguration of Christ”, a stone and stained glass mosaic. Click of the title and judge for yourself if I was successful, but overall I felt good about my first attempt.
DECISIONS & MORE DECISIONS — GETTING STARTED
I can’t explain why I chose this particular subject matter or composition. Over the past several years, I have been “going with my gut” about how to proceed with my artwork, hoping that little voice was the Holy Spirit guiding me. The image of Jesus crossing the water to his Apostles from an engraving by Gustave Doré was stuck in my mind. I had already worked with the image, over-painting it with watercolor. That painting is called “Jesus Walking On Water”, and I have a separate blog post on the process I used (“The Origin of Paradise Found Studio”).
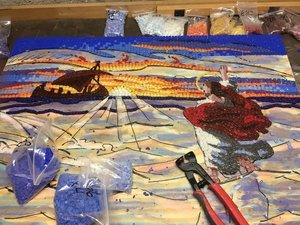
To create the “Be Not Afraid” mosaic, I started with a scrap piece of 3/4” pine plywood that was about the right size. Yes, the decision on the size of the final piece was are arbitrary as that! I set it up on a workbench in an unfinished part of my basement. A creepy but clean area where I can crank Pandora and fling pieces of glass everywhere without causing any harm. I drew the image on the plywood with Sharpie marker, and added a rough watercolor under-painting. This wouldn’t be something to follow exactly, just to help guide me a bit.
The next step was to select colors of the mosaic tiles. This isn’t like painting where you can mix paints to get what you want. I had to select from a very finite pallet of colors with just a mental image in mind, all the while knowing if I got it wrong, I could be wasting big bucks in glass. The glass comes in 8mm pre-cut squares from a company called Mosaic Art Supply.
I also had to decide on how to apply the tiles. For my stone mosaic, I used traditional mastic that you would also use tiling a shower wall. Effective, but not precise enough for 8mm tiles. I went with Tile Glue, which is pretty much the consistency of Elmer’s Glue.

I started with a marker and watercolor under-painting on 3/4” pine plywood.


Over 6,000 glass tile pieces were glued one at a time. The final mosaic appears very bright here without the sandy brown grout to dull it down.
SNIPPIN’ AND GLUIN’ — CREATING A MOSAIC
When people look at a mosaic, they often think that there has to be a shortcut. Nobody is going to snip and glue that many little pieces of glass. Well, I’m both sorry and happy to say, there aren’t any shortcuts with this type of piece. When applying large solid areas, you can buy small tiles in sheets, like you do for kitchen or bathroom tiles. You glue the sheet into position, and peel away the backing paper or plastic. When the colors and shapes vary as much as they do on this piece, you have to cut and trim one oat a time.
To cut a tile, I used nippers that break off pieces, which tend to shoot across the room. It isn’t an exact science, because the glass tiles often have their own idea how they want to break, or they will just shatter in a bunch of pieces. I started with Jesus’ face, a natural choice since that is a main focal point of the mosaic. Since this was my first glass tile mosaic, I probably should have started in a more obscure part of the composition to give me a chance to climb the learning curve. If you look closely, the cuts around Jesus’ head and upper body are less nuanced than the waves done toward the end of the process. I started mainly cutting tiles in half, either along the length or diagonally. As I gained confidence, I started to cut as varying angles.
The tiles themselves have a smooth side and a wavy side. I faced the smooth side out in flat areas like the sky, and wavy side out to add texture for water and cloth. Little details that many won’t notice, but those are the life of a mosaic artist pasting one tile at a time. There are literally hundreds of decisions that have to be made (and sometimes unmade) as you go.
Once Jesus was complete, I then pasted the boat (and St. Peter waving, if you look closely enough), the horizon, clouds, sky, then the water. For the waves, I started with the peaks and foam because they would define the shape and texture of the water. The choice of the colors on the waves were dependent on the direction that part of the water was facing. I tried to keep in mind the optics at every step, with the hope (and prayer) that it would all pull together and look right.
Things didn’t always go right the first time, though. Once I was finished the wave edges, it seems to look gaudy to me. Too much color, which could distract from the overall composition. That led to the destructive process of tile removal. Before grout locks everything together, tiles can be chipped off. It’s a painful process, because I’m basically undoing hours of work with a hammer and flat-head screwdriver.
Once all the tiles were in place and I confirmed the composition looked good as a whole, I added grout. This is the same grouting process you would use in the bathroom. I purchased colored grout from Home Depot and applied it liberally to the top of the mosaic. Then I used a foam float, which is a flat rigid rectangle of foam with a handle, and spread the grout over the surface. This squeezes it into all the crevices between the tiles. They I used a damp cloth the wipe off excess grout, which also shapes the grout joints. Then I waited an hour for the surface to haze over, and use a wet scrubby sponge to remove the remaining think layer of grout residue. Tada — a finished mosaic was born after 6-weeks and about 100 hours!

The big reveal! Unwrapping the final framed mosaic for the first time was a real kick. The “Be Not Afraid” title and plaque was the idea of Father Larry Niese, Pastor of St. Michael The Archangel Roman Catholic Church.

The original mosaic proudly hangs in the main entryway of St. Michael The Archangel Roman Catholic Church. See it for yourself at 490 Arnold Mill Road, Woodstock, GA 30188.
FINDING A HOME
As hard as it might be to believe, I created this piece without any idea what I was going to do with it. I hoped to find a church that would display it prominently so as many could enjoy it as possible. I figured it might take bouncing around social media to find a good home, but it turns out the Holy Spirit had other ideas. I sent a photo of the finished mosaic (unframed) to Father Larry Niese, Pastor of St. Michael The Archangel Roman Catholic Church, my home Church, and asked if he had any ideas. Unknown to me, he just returned from a trip to South America. He later told me one of his objectives was to find a nice piece of art to hang in the Church entryway, but came back empty handed. He replied within an hour with his desire to hang it at St. Michael’s. I was elated and happy to donate it for the enjoyment of my fellow parishioners.
Father Larry helped me choose the frame design and he came up with the name “Be Not Afraid”, which is engraved on a plaque on the bottom of the frame. This alludes to a particularly moving passage in the bible where Jesus reassures his Apostles after they witnessed his tragic execution on the cross:
“In the fourth watch of the night he came towards them, walking on the sea, and when the disciples saw him walking on the sea they were terrified. 'It is a ghost,' they said, and cried out in fear. But at once Jesus called out to them, saying, 'Courage! It's me! Don't be afraid.'“ (NAB Mt 14:25-27)
Father Larry explained how pertinent this message is to our daily lives, with all the insanity that we are all faced with in our modern society.
The original mosaic proudly hangs in the main entryway of St. Michael The Archangel Roman Catholic Church. See it for yourself at 490 Arnold Mill Road, Woodstock, GA 30188. Go to https://saintmichaelcc.org/ for mass times and more information on St. Michael The Archangel Catholic Church.